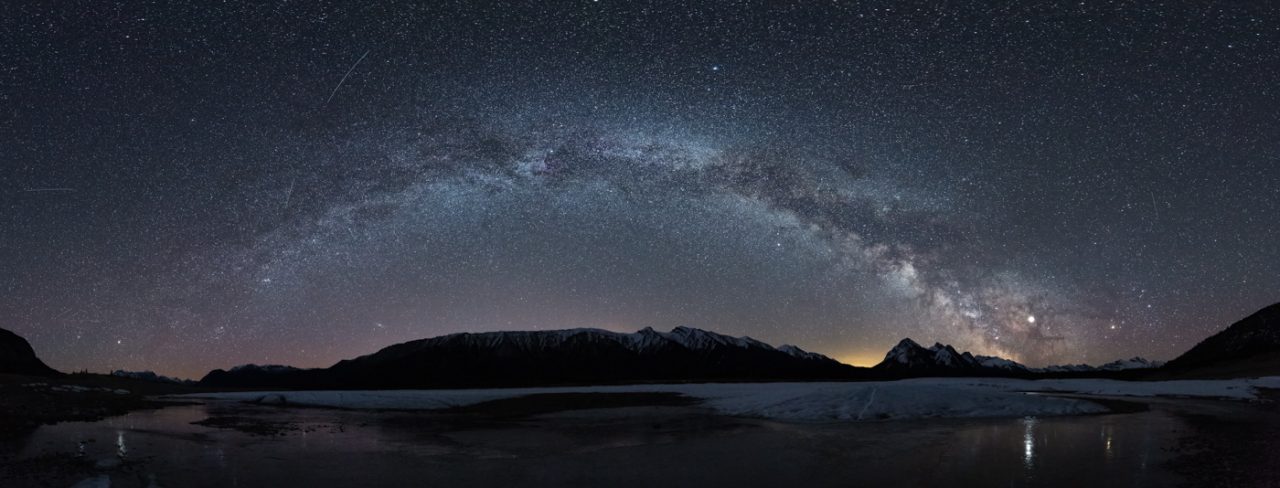
Milky Way Panoramas are a great way to capture the entire arc of the galaxy, especially in the spring when the arc is lower in the sky. A panorama is a wide view image, usually elongated horizontally compared to the vertical height (in some cases, the opposite will work too). A series of overlapping exposures are taken, with the camera typically set to portrait orientation, to create a panorama. In this post, I will discuss some aspects of shooting nighttime panoramas (panos).
If you are shooting at night, you likely already have your camera on a tripod and are using an intervalometer or timer to trigger the shutter. Try to level your tripod and camera to ensure the panorama will easily stitch together later and to minimize any distortions. I have shot some panos where my camera was not level (laziness, an awkward location like a steep slope, etc.). Not levelling properly just makes things harder for you in post. So when you can, get it as perfect as possible in camera.
A general rule of thumb for panos is to have a thirty percent overlap for images. At night I try to overlap the images by approximately fifty percent to have more information for matching points between images.
To stitch the images together an editing program is used. Both Lightroom and Photoshop can stitch a pano together. I have found for some more complicated panos or for certain nighttime ones, the stitching goes awry. After some failed stitches, I researched and invested in an image stitching software. The one I chose is PTGui.
So how do you create your panorama? As mentioned previously, you need to take a series of images. To get the full Milky Way arc, it usually takes me at least six to eight photos with a wide angle lens (14-20mm) in a vertical orientation and sufficient overlap. More than that may be required to encompass the composition you have in mind. One question many people have for me is, “don’t the stars move too much during the process?” From shot to shot, the stars don’t move that much. If you ensure you have enough overlap, whatever program you are using for stitching should be able to figure out how to match things.

Once you have your images, upload them onto your computer and decide what program you will use to stitch your images. I’ll go through how I use PTGui (and how it can help when you mess up in the field).
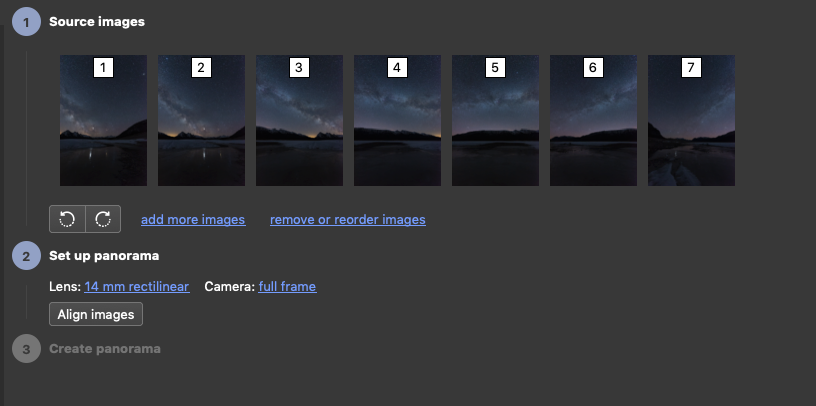


PTGui is a powerful program and allows you to have a lot of control over the creation of the panorama. There are many other tools available to you in this software, like masking. For example, if you had a cool meteor in one shot but not another, you could tell the program to keep the portion of that particular image containing the meteor.
I don’t just take horizontal panoramas – it is possible to create vertical panoramas. Shooting a pano this way is useful for creating larger files and getting a larger angle of view for your final image. I have an example where I shot a vertical panorama when the Milky Way was almost in a straight up and down position. I used three horizontally oriented images.

Two-row panoramas are also possible and can be very beneficial for night photography. From spring to fall, the Milky Way arc continues to get higher in the sky during hours of darkness. So even in June, it might not be possible to get a panorama that contains the Milky Way arc and your foreground, even when using a wide angle lens like a 14mm. This pano is a 360 pano that utilized two rows of vertical images.

Here is an example where I tried to shoot the whole arc but using only one row of vertically oriented images. The photo below was taken in August, so the arc is high in the sky. My foreground only includes the tops of the peaks around me.

How to shoot Milky Way panoramas are a topic that come up in my night photography workshops! You can join a group workshop or book your own private session.